Words And Bytes
Thursday, December 23, 2010
Creating an iTunes Audiobook from CDs
I don't listen much to CDs anymore, lately I prefer to keep all of my audio on my iPhone for listening to on long commutes and vacation trips. However, I still have some audiobooks on CDs I bought some time ago, and sometimes I check out CD audiobooks from my local library.
I am reluctant to buy audiobook CDs and I worry about the ones I have. It seems that CDs have a relatively short life, and the plastic is prone to scratches and becomes yellowish and weak over time. Some people says that CD rot is a myth, but they recommend archiving procedures that seem complicated. Here are some ideas on how to build an iTunes audiobook library from a CD collection. After that, the task of keeping back ups on digital files, is another issue.
I tested this on a Mac OS X 10.6.5 and 10.6.6, iTunes 10.1.1 (4), but it may also apply to other systems.
It is easier that it looks; I've just chosen to include explicit details for people that don't have computer (or Mac) expertise.
Preparation steps:
- If you can, find a “Table of Contents” of the book you are planning to import in iTunes, that would make easier to identify chapters and subchapters, so you can decide how you are going to split the audiobook tracks into chapters.
- Also, you may want to use an image search to find a picture for the Audiobook cover on iTunes and the iPod. If you don't find it, you can draw one, scan the CD box, or any other creative solution. Usually a size between 300x300 and 500x500 pixels is enough.
1. Change iTunes import settings
The idea is to reduce the size of the audio file you'll get, while preserving certain sound quality.
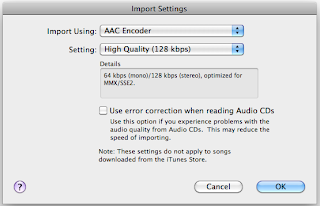
Open iTunes. Click on “iTunes" on the menu bar, then click "Preferences...”. Within the “General” tab (the first) press the button “Import Settings...”. It is near the bottom where it says "When you insert a CD".
Write down your current settings (mine are “AAC Encoder”/”iTunes Plus”). Then make these changes:
“Import Using” = “AAC Encoder”.
“Setting” = “High Quality (128 kbps)”.
Click " OK".
Click " OK".
2. Import the CDs
With iTunes open, take the first CD of the book and insert it into the computer:
-Answer “No” if iTunes asks if you would you like to import the CD into your iTunes library.
-iTunes will show a list of tracks. Select all of the tracks that belong to the same chapter by holding down the control button as you click on each.
In some cases, iTunes will not show identifiable names for tracks, or even for the audiobook itself, but sometimes it will. A few books on CD already create one track per chapter, but most of them create a track every 3 minutes or so. Even when divided into sections by minutes, many audiobooks start a new chapter with a new track.
You may need to listen to the beginning of each track in order to know how to organize them. If they are partial chapters (a continued chapter at the start of the CD, or an unfinished chapter at the end of the CD), we can try to fix it later, on step 6.
-On the menu bar select “Advanced" and then select "Join CD Tracks”.
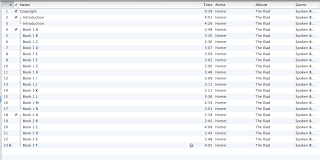
You should see a thin line along the left side of the track listing and a check box next to the first track of every chapter.
-Press the “Import CD” button in the lower right corner of iTunes.
Repeat this process for every CD of your audiobook until you finish with the whole book.
3. Change the Name tags to identify the chapter names and prepare them to show as audiobooks
At this point the imported tracks will show as music instead of audiobooks, and they may have the wrong information listed for titles. We'll fix this here.
We can find the imported tracks on the Playlist called “Recently Added”.
On each imported chapter control-click (or right click) and select “Get Info”:
On each imported chapter control-click (or right click) and select “Get Info”:
On the tab "Info", edit if different:
-Name: Title of the chapter
-Artist: Author's name
-Album: Book's title
-Genre: “Spoken & Audio”
-Track Number and Disc Number: this keeps chapters in order in iTunes
-Year: Year of publication (optional)
-Composer: Actor who is reading the book (optional)
-Comments: Additional information, like subchapters, notes, etc. (optional)
On the Tab “Options”, check:
-Remember playback position
-Skip when shuffling
Leave it as music for now and press OK.
Locate the image you chose for the cover art, select the file, then copy it to the clipboard (control-c or Apple-c).
Select ALL of the chapters for the entire book by highlighting (selecting) the first one, then scroll down to the last one and hold down the shift key while you select the last chapter by clicking on it. All of the chapters in the book should be highlighted now.
Select ALL of the chapters for the entire book by highlighting (selecting) the first one, then scroll down to the last one and hold down the shift key while you select the last chapter by clicking on it. All of the chapters in the book should be highlighted now.
On the highlighted chapters do control-click (or right click) and select “Get Info”. An alternative is to just go to File on the menu bar and select "Get Info there. You may get a window asking if you want to edit information on multiple items at once. Answer yes.
4. Make the chapters show as an audiobook in iTunes
On each imported chapter do select “Get Info”, to change:
Tab “Options”, setting “Media Kind” as “Audiobook”.
You could do it also selecting all the chapters at once (the same with other tab options and the artwork).
5. Change back the import settings in iTunes to the ones you had before
Mine were “AAC Encoder”/”iTunes Plus” (see step 1)
6. Final issues and joining the split chapters
Use the free program Join Together to merge chapters that span between more than one disc on a single track. Join Together requires Quicktime Player 7, which is usually on Snow Leopard CD (it can coexist with the last version that is usually installed). The Join Together website has some information on how to install it, if needed.
Select the two tracks you want to join on iTunes and then press ”Get Tracks From iTunes” on Join Together. The program will fill up most of the information. It seems to not to copy the “Comments” and Track and Disc numbers, and the name. Make sure that the two tracks to be merged are on the correct order.
The m4b extension is for audiobooks, and m4a for music, but this can be changed later on iTunes (see step 4).
Do not use the “chapterize” option here.
Then press “Proceed” and the new chapter will be created on iTunes.
After joining chapters, the artwork sometimes doesn't get copied, so it may need to be added to the new track.
Then, after making sure that all is right, delete from iTunes the tracks you have just “joined” in one.
7. If possible, “chapterize”
Use the program Join Together again (see step 6) to merge all the tracks together creating a single file with chapters on it. This is nice to have when listening to a book on the iPod.
This seems to fail when the audiobook is too large (like more than 12 hours), due to limitations on QuickTime 7. If that is the case, the book could be split on a “chapterized” part 1, with half of the chapters, and then a part 2 with some others, and so on. Some "try and error" may be necessary.
Labels: Audiobook, CD, Chapters, iTunes


Post a Comment